
Essential Crochet Stitches Every Beginner Should Learn
- Alyssa

- Sep 20, 2022
- 5 min read
Updated: Feb 6

In my last post, I gave a list of all the essential crochet equipment, and in this blog post I am going to teach you some beginner crochet stitches that you need to learn. They are laid out and explained in the simplest terms, with photos and videos to help you along the way.
A small note before we start. I work in UK crochet terms. If you are confused about the difference between UK and US crochet terms, make sure you check out my post here where I explain it in detail.
Contents:
Holding your hook:
There are two ways of holding your crochet hook: using the pencil grip or the knife grip. As expected, the pencil grip is holding your hook like you would a pencil, the knife grip as you would a knife.
Everybody is different and so everyone will hold their hook in a slightly different way. I learnt to hold my hook like a knife and so find this the most comfortable way - in fact, I have tried holding it differently and find it most uncomfortable! Try experimenting and see which way best suits you. The main thing is to make sure you are completely comfortable and can easily move your wrist.


Holding your Yarn:
There are many ways in which you can hold the yarn. Many beginners tend to hold it too tightly which can lead to tension problems. It also makes your life so much harder! In the pictures bellow, I will demonstrate the two ways in which I hold the yarn. The key thing is to let the yarn glide through your fingers easily.


Slip Knot:
Taking the end of your yarn (aka the tail end) in your left hand, pull up a loop of yarn (about 4 inches). Hold the middle of the loop with your right hand and the tail end and other piece of yarn with your left.

Insert your thumb and index finger into the loop, opening them slightly.

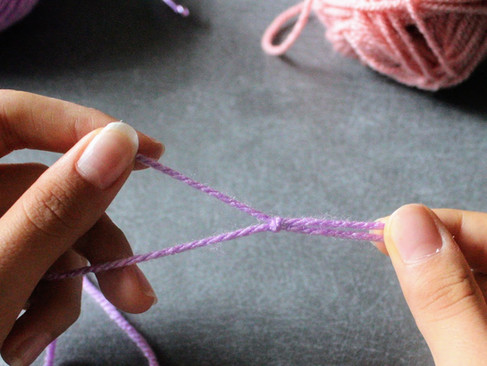
Twist your right hand towards you - you should have created an 'X' with your yarn. You many need to adjust your fingers slightly (as you can see in the photo below).

With your thumb and index finger, reach over and grab the top piece of yarn in your left hand (the tail end).

Pull this, slowly, though the loop. Be careful not to let go of your tail end otherwise it will pull through your loop.


Insert your hook into the loop, and lightly pull on your tail end to tighten it around your hook.


Beginner Crochet Stitches
Chains:
Begin by holding your hook and yarn. I also like to lightly hold the slip knot on my hook with my thumb and middle finger.
We are going to start by "yarning over". To do this, point your hook diagonally down to the left, then back up behind the yarn.
Twisting the hook so the hook end is facing downwards, pull it through the loop on your hook. After you have pulled through, twist your hook back up.
Keep repeating this process for as many chains as you want.
Note: It is better for your chains to be loose. As a beginner, it will make it easier for you when pulling your hook through them.
Double Crochet
Your chains will look like little "V's". The loop on your hook DOES NOT COUNT as a chain. For a double crochet, we are going to start in the second chain from the hook.

Holding the chain so that it is horizontal, insert your hook into the top loop of your chain.
Yarn over and pull it through. You should have two loops on your hook.
Yarn over again, and pull it through both loops. You have made one double crochet.
Insert your hook into the top of the next chain, yarn over, and pull through. You should have two loops on your hook. Yarn over, and pull though both loops.
Repeat these steps all the way down your chain.
When you get to the end of the chain, chain 1. This is called your turning chain.
Turn your work so that it is on the left side. This means you can now work down it.
If you look at the top of your work, you will see little "V's", similar to the chains. Each V is a stitch.
To work your second row, insert your hook under the first V.
Yarn over and pull though. You should have two loops on your hook. Yarn over and pull through both loops.
Repeat with the next stitch.
Again, when you get to the end, chain 1, and turn your work, right to left.
Half Treble Crochet
Make a chain. Wrap your yarn around your hook (like you do when yarn over), and insert it into the top of the third chain from the hook.
Yarn over, and pull through the chain. You should have three loops on your hook. Yarn over and pull though all three loops.
Yarn over and insert your hook into the next chain. Yarn over, pull though the chain - you should have three loops - yarn over and pull though all three loops.
Continue like this down the chain.
For a half treble crochet, chain 2 at the end.
Turn your work.
Working under the first "V" (just like in a double crochet), yarn over, insert your hook, pull though. Yarn over and pull though all three loops.
Continue like this down the row.
Treble Crochet
Make a chain. Like with a half treble crochet, yarn over the hook and insert it into the third chain from the hook. Yarn over and pull though (you should have three loops on your hook), yarn over and pull through the first two loops (you should have two loops left on your hook). Yarn over, and pull through the two loops.
Repeat into the next stitch: yarn over, insert into chain, pull through, yarn over, pull through two loops, yarn over, pull though two loops.
Continue like this down the chain.
For a treble crochet, chain 3 at the end.
Turn your work.
Unlike the double and half treble, the chain 3 you made (the turning chain) counts as your first treble crochet. Because of this, for round two, you don't insert your hook into the first stitch, but the second. From here, you will continue along the row, creating your treble crochet in each stitch like you did in the first row.


Comments