


Crochet a Basic Hexagon (super quick & easy!)


Jump to:
If you love granny squares but want something a little different, I have just the thing! These solid hexagons are the perfect change and are great for newbies and seasoned crocheters! Not only are they super quick to work up, but they can be used for so many things - blankets, bags, cardigans and jumpers; the list goes on!
From a beginner's perspective, these hexagons are a great stepping stone as they'll teach you a range of techniques. You'll learn how to crochet in the round, how to increase correctly to create corners that don't curl inwards, and then, when you're feeling a bit more confident, you can experiment with different colours and textures to create some gorgeous hexagons!
So, with all of that being said, let's get started!

What Yarn Should I Use?
You can use whatever kind of yarn you like! I'm using the Robin 100% acrylic chunky yarn in that shade pale rose. If you're a beginner, I recommend using a slightly chunkier yarn when you're learning, as it will help you to see your stitch and will also help with your tension. You can also use as few or as many colours as you would like!
What Hook Should I Use?
Whatever size is best for your yarn! I'm using a 6mm (my yarn recommends a 5.5mm-6.5mm) and I've found this works best for my tension. If you're unsure which size to use, use the recommendations of your yarn label. If you're finding that your stitches are too tight, try sizing up your hook by 0.5mm/1mm!
What You'll Need:
a yarn of your choice (see notes above)
a crochet hook (see notes above)
a pair of scissors
a darning needle
Stitch Abbreviations:
ch(s): chain(s)
dc: double crochet
sl st: slip stitch
st(s): stitch(es)
Pattern Notes:
This pattern is worked in US crochet terms, not UK. If you are unsure about the difference between these two terms, check out my blog post here, where I explain it in detail.
The chain 3 at the beginning of each round does count as a stitch.
The hexagon is made in rounds. Do not turn at the end of each round.
Any information inside the brackets {} is to be repeated.
Method:
Round 1:
Begin by making a magic ring (click here if you're unsure how to do that).
Or, if you don't want to make a magic ring, chain 5 and sl st into the 1st chain to create a ring.
Ch 3 (counts as 1 dc).
Make 1dc into the ring, then ch 2.

{Make 2dc into the ring, then ch 2}. Repeat this until you have 6 groups of 2dc in total (you'll finish the round with ch 2).
You can now close your ring by pulling the tail end at the back.
To close the round, sl st into the top of the beginning ch 3.

Round 2:
Ch 3.
Make 1dc in the next stitch.
You should have reached the 1st ch 2 space. Into this, make: 1dc, ch 2, 1dc.

Continue in this way around your hexagon: make 1dc into each stitch along the sides, and then {1dc, ch 2, 1dc} in each ch 2 space.
You will finish the round at the 6th corner. To close the round, sl st into the top of the beginning ch 3.

Round 3:
Ch 3.
Make 1dc in the next 2 stitches.
You should have reached the 1st ch 2 space. Into this, make: 1dc, ch 2, 1dc.

Again, continue in this way around your hexagon: make 1dc into each stitch along the sides, and then {1dc, ch 2, 1dc} in each ch 2 space.
This time, when you get to your 6th corner, you'll have 1 stitch remaining. Into this, make 1dc.

To close the round, sl st into the top of the beginning ch 3.

Round 4:
Ch 3.
Make 1dc into the next 3 stitches.
You should have reached the 1st ch 2 space. Into this, make: 1dc, ch 2, 1dc.
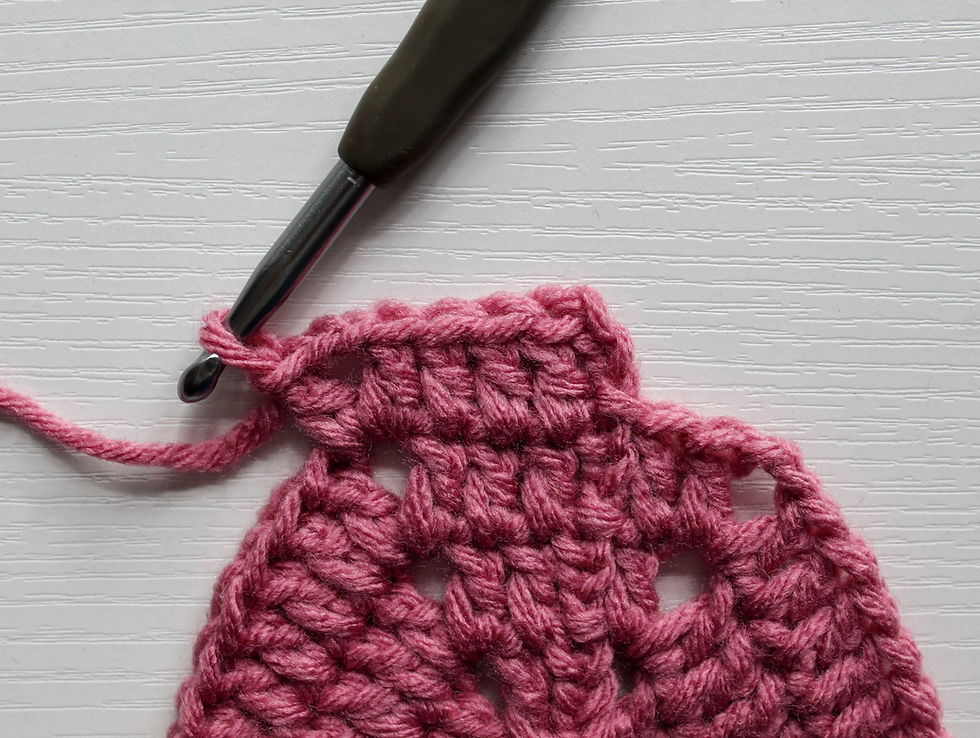
Again, continue in this way around your hexagon: make 1dc into each stitch along the sides, and then {1dc, ch 2, 1dc} in each ch 2 space.
This time, when you get to your 6th corner, you'll have 2 stitches remaining. Into these, make 1dc.

To close the round, sl st into the top of the beginning ch 3.

You can continue to crochet as many rounds as you would like!
And there you are! You now have your own crochet lace coaster! If you liked this super quick pattern and tutorial, make sure you subscribe to our monthly newsletter so that you never miss out on a new, free crochet pattern, and don't forget to drop a comment below if you have any questions!
And if you create anything using one of my patterns and share it online, I'd love to see it! Make sure you tag us!


Comments