
Easy Crochet Rose Keychain - a Free Tutorial!
- Alyssa
- Apr 27, 2025
- 4 min read
Updated: Dec 1, 2025

Who does not love a keychain? You can add them to anything: bags, purses, a crochet hook case, and even a phone (if it's small enough!). The point is, a keychain - especially a crochet keychain - can add that little bit of personality to something, and that's why I love them!
I also love crocheting flowers. That is why I thought I'd make a pattern for a rose keychain. I honestly love it, and have made so many that I've gifted them to family members and friends!
Some Tips!
This keychain is made in two pieces and is super easy to adapt! If you wish for a bigger or smaller rose, my first recommendation is to size up or down with your yarn and hook. I have used a lightweight/dk yarn.
I have also purposely made this without a metal keychain. If, of course, you would like to use one, I've included instructions for that. However, I don't know about you, but I don't always have a spare keychain lying around!
What You Will Need:
DK/lightweight yarn in a colour of your choice (I'm using pink), and green.
a 3.5mm crochet hook.
a pair of scissors.
a darning needle.
a metal keychain (optional).
Stitch Abbreviations:
sc: single crochet
hdc: half double crochet
dc: double crochet
sl st: slip stitch.
Pattern Notes:
This pattern is written in US crochet terms, not UK. If you are unsure about the difference between the two terms, check out my blog post here where I explain it in detail!

Method:
For the Rose:
Taking your pink yarn, make a slip knot. Then chain 55.
Make 1dc in the 7th chain from your hook.

Skip 2 chains. In the 3rd chain, make: 1dc, chain 3, and then 1dc in the same stitch. This has created your first "V" stitch.

Repeat the above step, creating "V" stitches along your chain. Your final "V" stitch will be in the last chain. Note: your chain will start to curl. Don't worry, this is exactly what you want it to do!


To finish, chain 3 and turn your work.
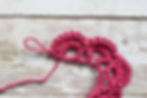
In the 1st chain 3 space, make 4dc.

Then, in the gap between the 2dc from the previous row (see photo below for help), make 1sc.


In the next chain 3 space, make 5dc. In the gap between the next 2dc, make 1sc.

Now, in the next 14 chain 3 spaces, make 7dc. In each gap between, make 1sc. You will have 1 "gap" remaining.

Into this gap, make your final 7dc and 1sc. Fasten off, and cut your yarn, leaving a long tail end. We will use this to sew our rose together.

Assembling your rose:
Take the end that has the smaller dc clusters. Begin rolling it inwards until you have a shape that resembles a rose.


Then, using your darning needle and long tail end, sew across the bottom, making sure you catch each layer. Sew through the layers as many times as you need until your rose is nice and secure and won't unravel.

Secure it with a knot and cut any remaining yarn.

Creating the base, leaves, and keychain:
Taking your green yarn, chain 5. Then, sl st back into the 1st chain. This will create a small ring which we will work into.
Chain 1 (this does not count as a stitch). Working into your ring, make 6hdc. Sl st into the 1st hdc to close the round.

Chain 1. Make 2hdc in each stitch around. Sl st into the 1st hdc to close the round (12hdc in total).

Chain 1. Make 2hdc in the 1st stitch, then 1hdc in the next stitch. Repeat around (18hdc in total). Sl st into the 1st hdc to close the round.

From here, we are going to create 2 leaves. Chain 9.
Make a sl st in the 2dc chain from your hook. Working down your chain, make: 1sc, 1hdc, 1dc, 1dc, 1dc, 1hdc, 1sc.

Sl st back into the same stitch to secure your leaf. Then, sl st into the next stitch.

Repeat the above steps to create your 2nd leaf.
If you are using a metal keychain, fasten off here, and leave a long tail end (for sewing). If, like me, you are not: chain 60. Then sl st back into the same stitch. Fasten off and leave a long tail end. Note: you can make your keychain as long or as short as you would like. This is simply a guideline!

Assembly:
Take your green base and, using your darning needle and tail end, sew it to the back of your rose. Attach your metal keychain, if you are using one.

And there you are! That is it! You now have your own crochet rose keychain!

If you liked this super quick pattern and tutorial, make sure you subscribe to our monthly newsletter so that you never miss out on a new, free crochet pattern, and don't forget to drop a comment below if you have any questions!
And if you create anything using one of my patterns and share it online, I'd love to see it! Make sure you tag us!