
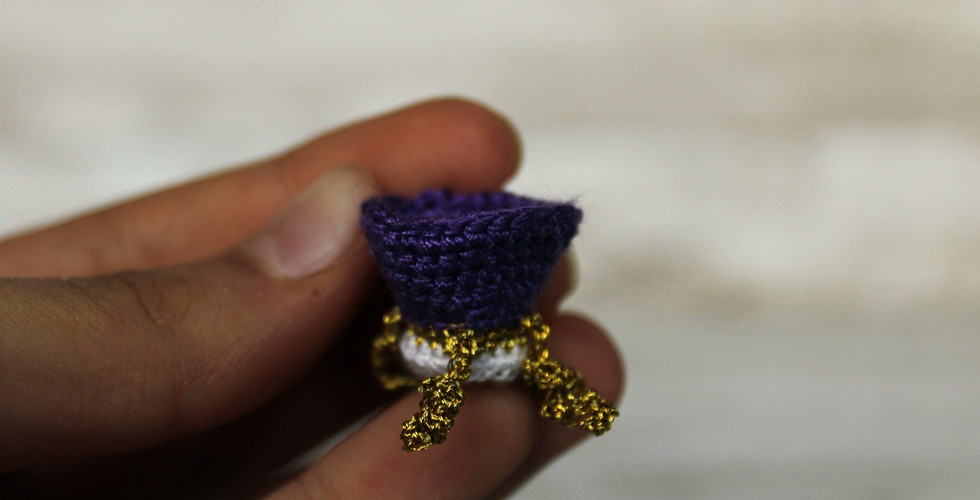
Micro Crochet: A Coronation Crown
- Alyssa

- Apr 13, 2023
- 4 min read
Updated: Feb 6

Anything that is tiny is cute, right? If you are like me and love tiny versions of objects, then I think this crochet pattern is right up your alley...
Now, this pattern is definitely aimed at more advanced crocheters, simply because of how small this crown is. Miniature crochet is of course fiddly - you either love it, or you hate it. I don't really think there is an in-between. However, if you want to make a crown like this, just larger, you can simply use a yarn that you would usually use and the corresponding hook.
If you are following the pattern exactly (size and all), there are a few things I would recommend:
Make sure you have a flat surface to work on. Most of us usually sit in a comfy chair with our favourite drink whilst crocheting, however, when micro crocheting, it is so much easier if you have a solid surface that you can lean on.
Crochet any tail-ends in. Now, what I mean by this is that when you join on a new colour, crochet over these tail ends during the coming rounds. This just means that you won't have so many ends to sew in when you finish - as this is unbelievably fiddly!
Make sure you are working in good light. Now I know this seems obvious, but it would suprise you how often we all crochet in dim light. When working with such tiny stitches, you need all the help you can get in seeing them.
Use a normal sewing needle instead of your usual darning needle.
Materials:
1mm crochet hook
general sewing thread in white, gold (or yellow), and purple.
sewing needle
scissors
toy stuffing (optional)
Note: I like to make my sewing thread thicker by using the 'S' method (something which I also do if I want chunky yarn in my normal crochet projects). However, you can use 2-3 strands of embroidery thread instead. I personally find that using general sewing cotton easier to work with.
Stitch Abbreviations :
ch: chain
dc: double crochet
htr: half treble crochet
inc: increase
st/sts: stitch/stitches
sl st: slip stitch
BLO: back loop only
Pattern Notes:
This pattern is worked in UK terms.
It is worked in separate rounds, and so you do join with a slip stitch at the end of each round. However, you do not turn at the end of each round.
The chain 1, and chain 2 at the beginning of each round do not count as a stitch.
Method:
Creating a ring:
Beginning with the white thread, ch 16.
Insert your hook into the 1st st, and join with a sl st. You should now have a ring.

Round 1:
Ch 1.
Make a dc in each st around. (16sts)
Joining on your gold thread, sl st to the top of the 1st dc to close the round.
Round 2:
Ch 1.
Make 1dc in each st around (16sts).
Sl st to top of 1st dc to close the round.

Round 3:
For this round, we are going to create 4 'strips' which we will sew together at the end.
Ch 18.
Working your way back down this ch and starting in the 2nd ch from your hook, make 1dc in each st. (17dc in total). Sl st into the same st to join.
*Dc in the next 4sts. Ch 18. Make 1dc in each st down (17dc in total). Sl st into the same st to join.*
Repeat from * two more times. In the last 3sts, make 1dc. When you get to your last st, join your purple thread by making a sl st instead of a dc.


Round 4:
You are now going to be working behind the yellow strips, creating the centre of the crown.
Ch 2.
Skipping over the first gold strip, make 1dc in the BLO of the first 4sts. *ch 1. Skip over the second gold strip. Make 1dc in the BLO on the 4dc.*
Repeat from * for the rest of the round.
Make 1dc in the last 3sts. Sl st into the first ch of the the beginning ch 2 to close the round.

Round 5:
Ch 1.
Make 1dc in each st around - when you get to the ch 1, work your dc around it.
Sl st into the top of the 1st dc to close the round.

Round 6:
Ch 2.
Make: 4htr, inc, 3htr, inc, 4htr, inc, 3htr, inc.
In the last 1st, make 1htr.
Sl st into the top of the beginning ch 2 to close the round.


Round 7:
Ch 2.
Make 1htr in each st around.
Sl st into the top of the beginning ch 2 to close the round.

Round 8:
Ch 2.
Make: 3htr, inc, 4htr, inc, 3htr, inc, 4htr, inc, 3htr, inc.
In the last st, make 1htr.
Sl st into the top of the beginning ch 2 to close the round.


Round 9, 10 & 11:
ch 2.
Make 1htr in each st around.
Sl st to the top of the beginning ch 2 to close the round.
Fasten of, and leave a reasonable tail - enough to close the top.


Creating the Top Sphere:
Round 1:
Make a magic ring. Into this, make 6dc.
Round 2:
Make 1dc in each stitch around (6dc in total).
Sl st into th first stitch, fasten off, and cut your yarn (leaving enough to allow you to sew onto the crown).
Closing the top:
Thread your darning needle with the tail end on the crown.
Weave in and out of each stitch around, and then pull your yarn tight, closing the hole.
From here, sew each gold 'strip' up so that it is attached at the middle of your crown. If there is a small hole from where you tightened your yarn, these yellow strips will hide it.
Fasten off.
Now, taking your gold sphere, sew this right on top of the crown.
And there you are! You now have a tiny little crown. If you want to, you can put a little bit of toy stuffing in it to puff it out - however, this is completely optional!


Comments